Create a pipeline that blurs faces in an image
This tutorial shows how to implement a Pipeline in the Swiss AI Center project step by step. It will guide you through the process of creating a Pipeline to detect faces in an image and blur them.
Tutorial
Prerequisites
To follow this tutorial, you need to have the following tools installed:
- Python 3.11 (You can use Python 3.10 if you encounter issues with Python 3.11)
- An IDE (e.g. Visual Studio Code)
Prepare the Core engine
To implement a Pipeline, you need to have a running Core engine. If you don't have one, you can follow the Core engine documentation.
Prepare the services
The first step is to prepare the services that will be used in the Pipeline. In this tutorial, we will use the following services:
Launch the services
If the services are not running you can follow the explanations in the reference documentation to start them.
Create the pipeline
Start the frontend if you haven't already. Then navigate to the http://localhost:3000/create-pipeline page. From here you can choose among all available services the one you want to add to the new pipeline. First, select the Face Detection service. You can use the search bar and filters on the side to help you find it.

Click the Add button of the service. This will a add a new node in the flow chart.
Do the same with the Image Blur service. You should now have 4 nodes in the flow chart. You can click on the nodes to drag and move them around to rearrange their disposition.
There are 3 types of nodes:
-
Entry node. It defines the input files the pipeline needs, and their types. Each input file has a handle you can connect to a service to pass on the data as input for the service.
-
Exit node. It is the last node of the pipeline. The services connected to it define what the output of the pipeline will be.
-
Service node. Each one represents a distinct service. For each data input the service needs, there is a handle you can connect to a data source, either the output of another service or the input files of the pipeline defined by the entry node.
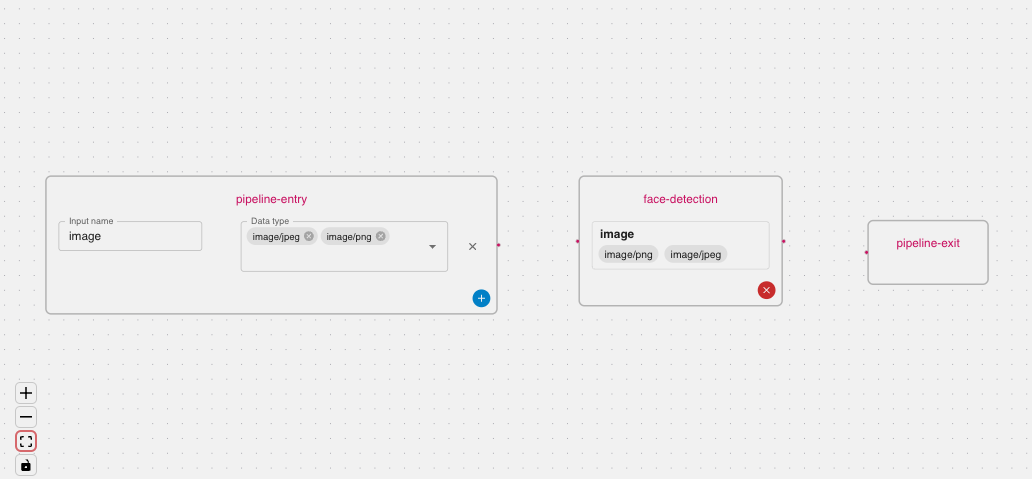
Click the Add input file button on the entry node, select a name for your input, and select the types image/jpeg and image/png.
The new input can now be connected to the services. Each of them takes an image, in this case it will be the same one. Click on the handle next to the input on the entry Node and drag your mouse to the handle next to the service's input called "image". Repeat this action for both services.
Note
The edges can be removed by clicking on them and pressing the Delete key on your keyboard.

There are two steps in the pipeline. The first one detects faces in a given image and the second blurs them. The output of the first service can be given to the second for the blurring process. To do so, link the output of Face Detection to the input of Image Blur as you did with the entry node inputs.
The second step should only be executed if at least one face was detected by the first service. Conditions can be added on input files by clicking the circled plus icon on the edge. Click on the edge connecting the output of the Face Detection to the Image Blur and input the following:
Conditions are python expressions that will be evaluated to determine if the service should be executed. You can remove a condition by clicking the "x" button next to it.
The second service can now be connected to the Exit node, completing the pipeline. Your pipeline should look something like this.

As a last step, the pipeline information must be completed. Input the following in the corresponding text fields.
You can check the state of the pipeline JSON object by clicking the Show JSON button.

Before creating the pipeline, make sure sure it's valid by clicking the Check Validitiy button under the pipeline information. An information box should be appear to inform you of the validity of the pipeline. Once the pipeline is valid, you can create it by clicking Submit.
The Pipeline is created by posting a JSON object to the /pipelines endpoint of the Core engine. Create a file named face-blur-pipeline.json in your IDE with the following code:
Note
You can find the slug of your services by going to the FastAPI documentation of the running Core engine and use the /services endpoint. You will find the slug of your services in the response.
What we just did is to create a Pipeline with two steps. The first step is the face detection service and the second step is the image blur service. The second step will only be executed if the first step detects at least one face. The Pipeline will take an image as input and return an image as output.
The inputs of each step are the outputs of the previous steps. The first step takes the pipeline's image as input and the second step takes the Pipeline's image and the result of the face detection as input.
Note
The identifier field of each step is the name of the step in the Pipeline. It is used to reference the step in the needs and inputs fields.
Post the pipeline
Now that we have our Pipeline, we can post it to the Core engine. To do so, go to the FastAPI documentation of the running Core engine and use the /pipelines endpoint to post the Pipeline by clicking on the Try it out button
Simply copy the content of the face-blur-pipeline.json file and paste it in the body field of the /pipelines endpoint and click on the Execute button.
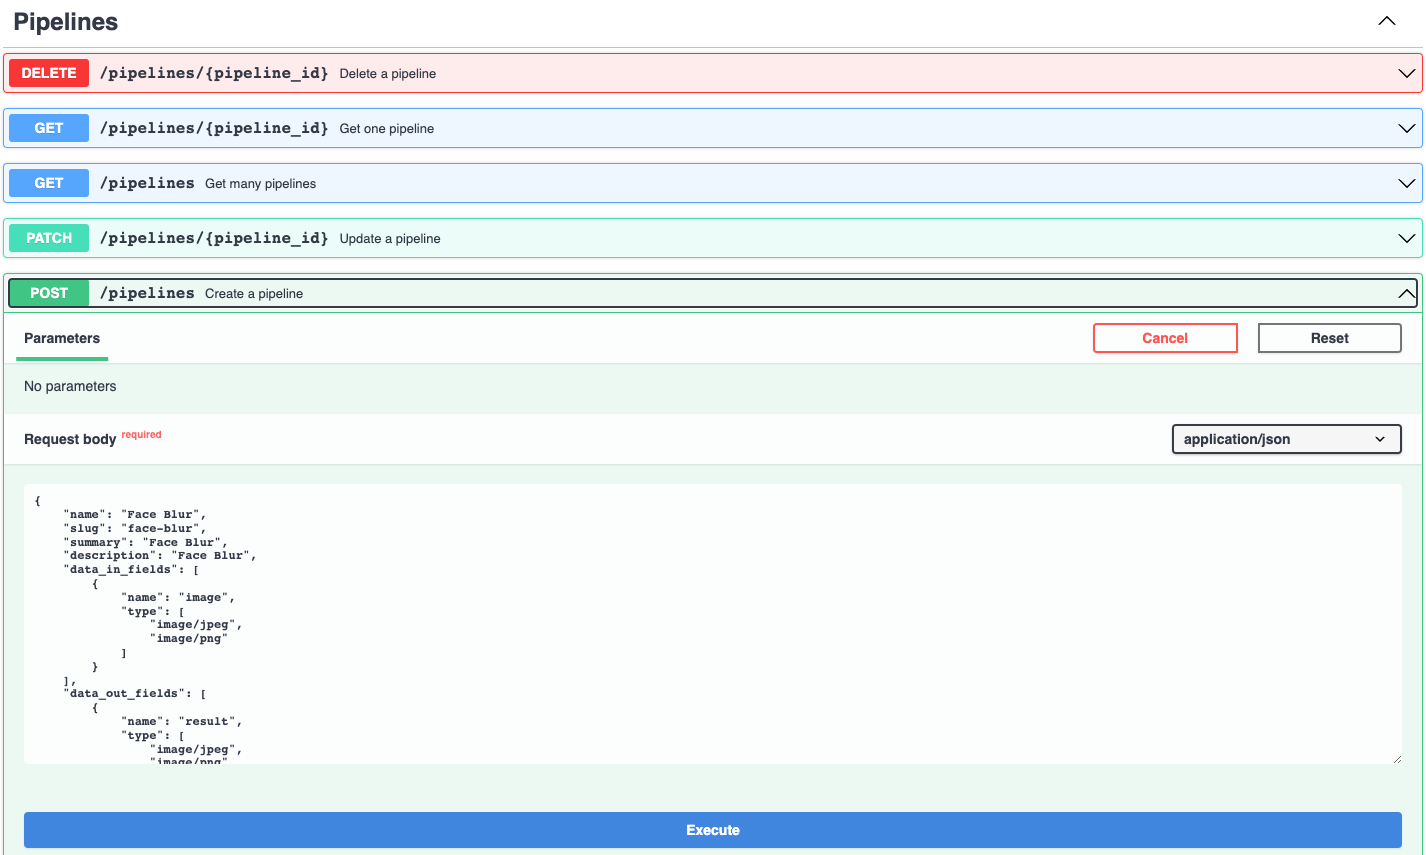
You should receive a 200 response with the Pipeline you just posted.
Run the pipeline
You can run the pipeline using the FastAPI Swagger interface or by using the Core engine.
You can also run the Pipeline using the Core engine. To do so, go to the Webapp in your browser and find the Pipeline you just posted in the Pipelines section.

Click on the VIEW button and you should see the Pipeline as a Flow.

Click on the UPLOAD button and upload an image. Now you can click on the RUN button and the Pipeline will be executed. When the Pipeline is finished, you can download the result by clicking on the DOWNLOAD button that will be enabled.
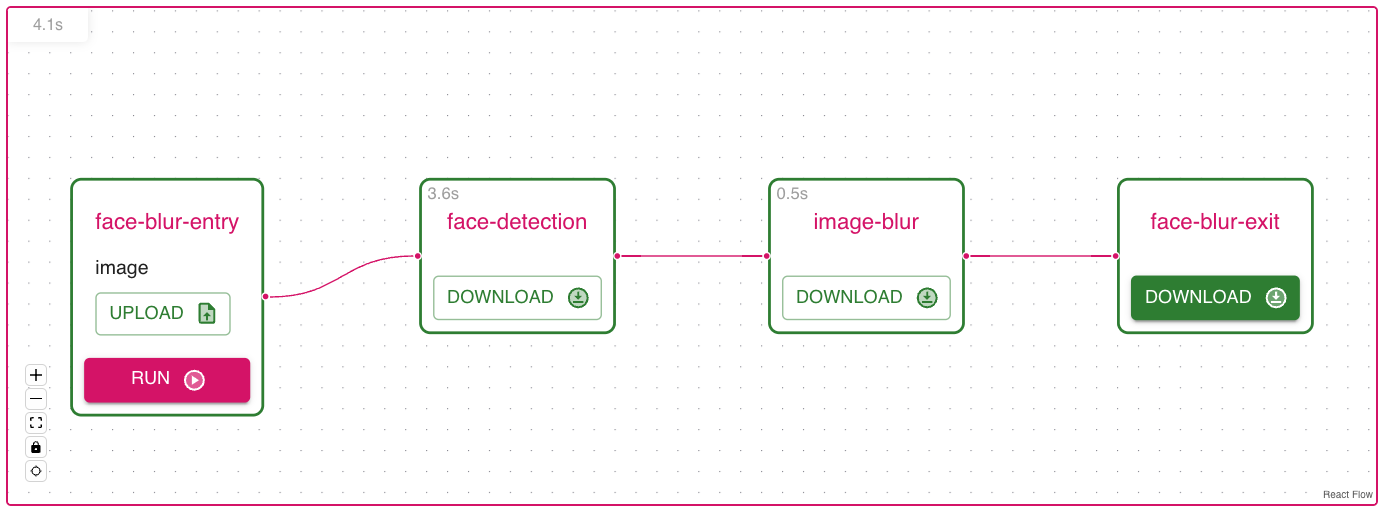
If the picture you provided had a face, the result should be blurred.
Congratulations!
You have successfully created a Pipeline locally. Now, you can use the same process to create a Pipeline on the Core engine deployed on the cloud.
Now that we have our Pipeline, we can run it. To do so, go to the FastAPI documentation of the running Core engine and you should see the Pipeline you just posted in the Registered pipelines endpoint with the slug /face-blur.

Click on the Try it out button, add an image to the body and click on the Execute button.
You should receive a 200 response with a Pipeline Execution object in the response body. This object contains the id of the execution and the tasks that will be executed.
You can check the status of the execution by checking the status of the last task with the /tasks/{task_id} endpoint. You can find the id of the last task in the tasks array of the Pipeline execution object.
Once the status of the last task is finished, you can download the result by copying the data_out file keys and use them with the /storage/{key} endpoint.

If the picture you provided had a face, the result should be blurred.